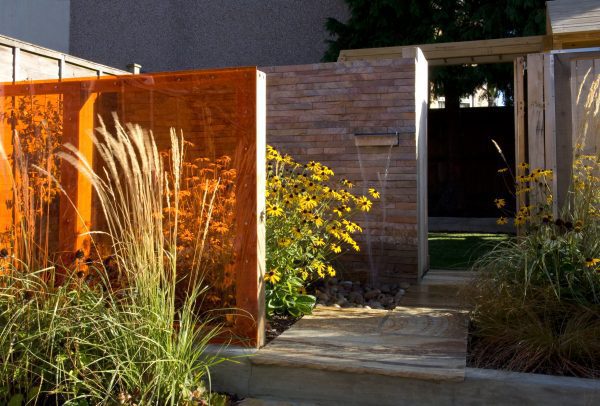
Putting Things into Perspex-tive

If you want to add a bold dash of colour and an instant contemporary feel to your garden, try using Perspex to create a feature. It is a great material for landscaping as it is waterproof, durable and easy to use. It is versatile too – you can use it to hide unsightly boundaries, make planters from it, create colourful screens or use it as an ornament to great effect. It isn’t the cheapest material in the world, at around £100 for a 2m x 1m sheet, but is still a relatively inexpensive way to give a garden the ‘wow’ factor. There are loads of different colours and finishes available, including mirrored, opaque and translucent, so you are sure to find one that is right for your situation.
One way of using Perpex in a garden that we are fond of at Earth Designs is as a decorative screen. These are fairly easy to make. To build a Perspex screen you will need the following tools: a spade, a spirit level, a cordless drill and set of drill bits, a wheelbarrow (or cement mixer), and a saw. You will also need the following materials: two treated timber posts (fence posts or similar), ballast (or building sand and 20mm gravel), cement, 40mm long stainless steel screws and washers, and of course your Perspex sheet. If you want to create a screen that is a different size to a standard Perspex sheet, ask the suppliers to cut it to size before delivery. If you forget, or don’t decide on the size until you already have the Perspex, use a small handheld angle grinder with a cheap metal grinding disc to cut the sheet to size. Take it slowly and you should get a fairly clean straight cut. Don’t be tempted to try using a jigsaw – unless you are extremely careful (or lucky) the cutting motion of the blade will cause the Perspex to crack.
First work out where you want to place the screen and dig two holes for your posts. Measure the width of your sheet of Perspex and make sure that the middle of your two holes are roughly the same distance away from each other. The post holes should be at least 150mm (6 inches) wider than your post all the way round and a minimum of 500mm (1 ft 8 inches) deep. Mix up some concrete using your ballast and cement in a 6:1 ratio (or 4:2:1 ratio if using sand and gravel). You will probably need around 75kg – 100kg ballast and roughly 15kg cement per hole. Make the concrete quite stiff, as this will help to hold the post upright in the hole while the concrete is curing.
Place your first post in the centre of the first hole and check its height. If you are creating a small screen out of a cut down piece of Perspex you will probably need to cut your posts down accordingly. Make sure you treat any cut ends with a preservative to prevent rotting. If the hole is too deep, you can use old bricks or other rubble to stand the post on to get to the right height. If it is too shallow – keep digging. Discard all the soil you dig out – you won’t need it again.
Once your post is at the right height in the hole, fill the hole with concrete. Use your spirit level to check that the post is upright in both directions and adjust accordingly. To get a strong foundation for the post, fill the hole in layers about 150mm – 200mm at a time, compacting each layer with a piece of wood to remove bubbles and air pockets. Be careful not to knock the post when doing this. Once you have filled to the hole to the top, smooth the concrete in the hole, sloping it downwards away from the post (this is known as ‘haunching’ and is vital to prevent water pooling around the post, which will eventually rot it).
Repeat the process for the other post, checking that the two posts are the right distance apart and running the spirit level across the top of the two posts to ensure they are at the same height. Also use your spirit level or a board on the side of the two posts to ensure that they are parallel and in line with each other – if one is twisted and facing a different direction to the other it will be difficult to attach your Perspex panel.
Once your two posts are completely dry – usually 24 – 48 hours – it’s time to fix your Perspex. Lay the Perspex sheet on a piece of old plywood or chipboard, or on a flat lawn. Using your drill, make screw holes all the way around the edge of the Perspex, about 25mm (1 inch) from the edge. Take time to measure your holes out so they are evenly spaced between the corners, approximately 200mm – 300mm (8 – 12 inches) apart, as this will give a more professional looking finish. The holes should be a couple of millimetres bigger than your screws, to allow the Perspex to expand and contract with changes in the weather. I have found over the years that I get a cleaner hole using a drill bit designed for metal, rather than a wood bit.
Once you have all your holes, simply screw the sheet on to the posts, making sure it is straight and level. Don’t forget to use a washer over each hole, to prevent damage to the Perspex, and be careful not to over tighten the screw. I have cracked a few sheets of Perspex in this way over the years!
And there you have it: One colourful Perspex screen that will be the envy of your neighbours.


