Garden layouts – What suits my plot?

Now you have identified your preferred styles and tastes and completed your garden site survey it is time to consider the layout, in essence the bone structure of the design. Garden layout -Take time to study your mood boards alongside images of gardens that appeal, work out your list of creative priorities and try to give due consideration to materials that will create the look you want to achieve. Do keep your budget in mind when considering materials: it is likely that you will be on a tight budget if you are undertaking a DIY approach to designing your garden, therefore spend sometime doing some practical research about the how much things cost.
Try to consider the relative values of materials. For example, softwood decking is generally significantly cheaper than hardwood decking but usually has an inferior finish and durability. How much does that matter to you? If you obtain quotes from specialist suppliers they may well be able to assist you with identifying materials from images you have gathered and could suggest alternatives if the cost is preclusive. It is important to design with materials in mind – some of the best features I have ever created have been born from the inventive use of materials.
Garden layouts – What suits my plot?
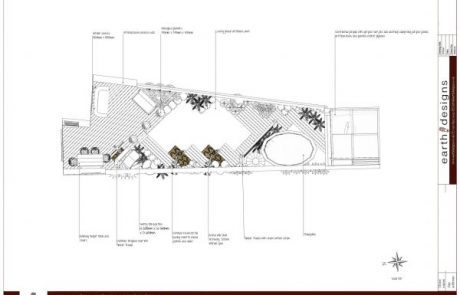
Drawing out the garden Your garden layout is the blank canvas for your design. To produce an accurate plan, spend time drawing your existing garden to scale using graph paper and a ruler. The easiest scale to work with is 1:100, which means that 1cm on paper equals 1 metre (100cm) in reality. However, if your garden is very large or very small, you may need to use a different scale to avoid your plan being too large to fit on the page or too small to read. For large gardens a scale of 1:150 or 1:200 will make an easier fit, while for a small space 1:50 will produce a larger, more legible plan. When laying out your plan ensure you mark all manhole covers, drains, windows and doors so that you are aware of their existence when you start drawing your new design. This is important to avoid placing features in impractical situations. For example you can’t design a raised bed to fall over a manhole cover unless you can include some provision for gaining access.
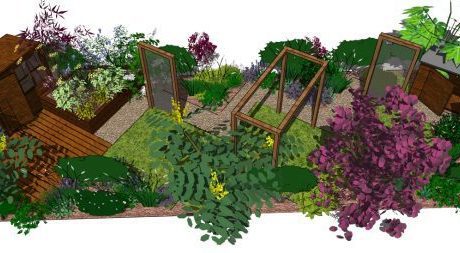
If you have a little experience with computers, you may prefer to use a design programme to help you draw out your garden. There are some useful free applications that can be downloaded from the internet, Google Sketchup being amongst the best. However do be careful not to get bogged down in the way the computer programme works when you should be concentrating on how your design will look. Most of the available free Computer Aided Design (CAD) programmes do take some practice and experimentation to get used to, so unless you are comfortable using a computer I would recommend you use the old-fashioned pen-and-paper method. Once you have drawn your scale layout and marked on all exits, utilities and any features you wish to keep, it is time to begin the creative process. Before plotting your design on the scale plan, you may wish to produce some simple sketches of your ideas. These concept drawings do not need to be to scale.
I always start each design with a basic hand drawing in which I sketch the general shape of the garden and then experiment with shapes and flow. It is a good idea to see what looks and feels right in the space to avoid numerous frustrating and time consuming re-drawings when you start to put things down on your scale plan. You can make as many loose sketches as you like until you achieve the best layout possible for you and your garden. If you want to see how certain features or items you have in mind for your new garden will fit the space, lay tracing paper over your scale plan and draw the features to scale. You can then move the features around the space without committing anything permanently to paper.
Consider the shape of the space.
Garden layouts – What suits my plot?
If you have a tricky shaped plot, you may wish to try and ‘fudge’ any awkward edges. Consider how you can smooth things over. A corner garden plot, for example, may be best off with a layout that curves and wraps round the space to increase flow and rhtymn in the garden, or you may wish to ‘tuck things away’ round the corner. If you have a long skinny garden, using horizontal or angled lines in the space will make appear wider and stretched out.
Similarly wide garden plots that aren’t very deep may benefit from circles, or lines running down the garden to help create the illusion of length. The internet is a great source of inspiration for different layouts and shapes to employ in the garden, so spend some time researching. Break from tradition and consider placing the planting in the middle of the space rather than spreading it around the edges, a neat trick to make the garden seem more interesting.
Garden layouts – What suits my plot?
Personally I am not a fan of grass or paving running to the very edges of a garden, as I think a little planting helps to soften the edges, but that doesn’t mean the planting can’t cross into the middle of the space or become a feature in its own right with the use of block or specimen planting schemes. Not all the boundaries need to be edged with planting beds – a few well placed beds can help break up the line of the boundary while avoiding the traditional all-round border look. Linking areas within the garden Once you have settled on your preferred shapes for the garden, work out how they link together. This is what is known as flow-through. Do the shapes touch each other meaning you can simply walk from one space to the next? Or do you need to link the various elements via a pathway? The way you link each section of your garden can make the space dynamic and exciting, creating intrigue and adding adventure with routes and journeys that create an experience for the user.
Work out from a practical point of view how you need to move through the space – do you need access to the shed at the bottom of the garden, or to a side gate? Be careful not to make routes too convoluted as we will naturally try and take the shortest path from A to B and your path may end up being underused. Also try to think practically as well as creatively – if you need to carry a bike through the house to a bike store at the bottom of the garden every day, give yourself an easy time and create a nice direct route with a broad pathway. You will soon tire of traipsing across a wet, slippery, muddy lawn in the middle of winter.
Garden layouts – What suits my plot?
Screening is a useful technique to employ when designing gardens. Most gardens will end up with something that would be better off hidden – a messy utility area, an unsightly shed, the compost bin or next door’s garage. Sometimes we may need to include screens for privacy and there is a variety of techniques you can employ from planting to hard landscaping options. Timber, brick or block walls, stainless steel mesh, Perspex, even filled wire gabions, are all great materials for screens. Focal points in the garden This simply means what you wish the eye to be drawn to. I usually start a consultation with a client by viewing their garden from inside the house to get a good idea of what is framed by the windows and doors. Stand outside the front of your house and look through the open front door.
Can you see right through the house to the back garden, and if so what sits within that frame? That will be the first thing a visitor will see of your garden so you will want to make it as attractive as possible. When out in the garden itself, a focal point can be a good way to draw the eye from an ugly area. Anything that gives that instant ‘wow’ factor – a sculpture, water feature, architectural plant, feature wall, an unusual piece of furniture – can create a focal point. However be careful not to add too many otherwise your garden can become busy and the visitor will not know where to look!


